
I was trying to figure out something fun Garrett and I could do/make for a wedding gift for our friends. I found the idea to etch on glass cookware. So Garrett and I went searching for the perfect pan, contact paper, and armour etch. After searching we found the contact paper and armour etch at Michaels.
The supplies you will need for the etching includes:
1. Armor Etch (Michaels); I bought mine with a 50% off coupon.
2. Contact Paper (Laminating sheets, found at Michaels with a 40% coupon)
3. Exacto knife (razor blade)
4. tape
5. Template (We printed off the writing from Word)
6. foam/ paint brush
2. Contact Paper (Laminating sheets, found at Michaels with a 40% coupon)
3. Exacto knife (razor blade)
4. tape
5. Template (We printed off the writing from Word)
6. foam/ paint brush
Garrett and I weren't too confident that the etching would turn out or look good so we first etched on glasses that we got at the dollar store. Next, we etched a bread pan for us with our last name on it. Then we etched a pan for a wedding gift.

Here are the steps to etching a glass surface:
1. Wash and clean your glass surface.
2. Cut out a peice of contact paper that is bigger than your stencil. You will want the contact paper to cover quite a bit of your glass surface to protect the glass from coming in contact with the cream where you don't want it. Carefully peel the backing off of the contact paper and stick it onto the glass. Be careful that there aren't bubbles or creases in the contact paper. You may need to rub some of the smaller bubbles out with your fingers.
3. Put your stencil where you want it (on top of the contact paper).
4. Tape down your stencil to keep it in place.
5. Take your Exacto knife and carefully cut out your stencil. You will have to push harder to make sure it cuts through the paper layer and the contact paper.
6.Remove the contact paper where you want your glass to be etched.
7. Paint the etch cream over the glass you would like etched. We left the cream on for about 10-15 minutes. You can also reuse the etching cream. So when the time is up scrape it back into the bottle.

7. Paint the etch cream over the glass you would like etched. We left the cream on for about 10-15 minutes. You can also reuse the etching cream. So when the time is up scrape it back into the bottle.

8. Then leaving the contact paper on your vase, rinse off the cream with water. Be careful where you rinse your cream off. The package cautions you from using porcelain sinks since the cream may damage the surface.
9. When the glass is clean peel off the contact paper.
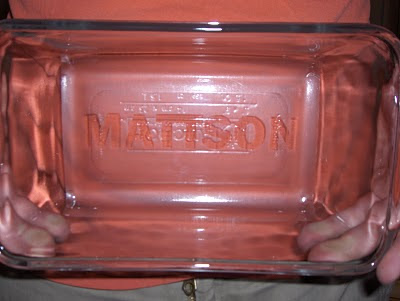
*** When etching a pan you need to etch the bottom of the pan, this means that you will have to etch the name backwards so that when you look at it from the top you can read the name correctly.
*** When etching a pan you need to etch the bottom of the pan, this means that you will have to etch the name backwards so that when you look at it from the top you can read the name correctly.
Here is our finished bread pan:


.JPG)
.JPG)


