Pages

20 July 2010

Cool and Easy Pie

COOL 'N EASY Pie
This is a easy refreshing dessert.


what you need

2/3 cup boiling water
1 pkg. (4-serving size) JELL-O Strawberry Flavor Gelatin
Ice cubes
1/2 cup cold water
1 tub (8 oz.) COOL WHIP Whipped Topping, thawed
1 HONEY MAID Graham Pie Crust (6 oz.)

make it

STIR boiling water into dry gelatin mix in large bowl at least 2 min. until completely dissolved. Add enough ice to cold water to measure 1 cup. Add to gelatin; stir until slightly thickened. Remove any unmelted ice. Add whipped topping; stir with wire whisk until well blended. Refrigerate 15 to 20 min. or until mixture is thick enough to mound.
SPOON into crust.
REFRIGERATE at least 4 hours or until firm. Store leftovers in refrigerator.

Homemade chicken noodle soup


I have never made chicken noodle soup and we had tons of chicken from the two whole chickens we bought and boiled. I used a recipe that I found at Allrecipes.com. That is my favorite place to find new recipes. They always taste so great. I decided to make the soup last minute so I didn't have all the ingredients the recipe called for, such as carrots which are a key ingredient. I also made the chicken broth from scratch. We loved this soup and it is much better than Campbell's chicken noodle soup.

11 Layer Bean Dip


I wanted to make something that I have never made before and after looking in the fridge I thought it would be fun to throw together a bean dip. As I continued to take things out of the cupboard and refrigerator I realized that it was going to be lots of layers. After making the dip I was worried that I made too much--- wrong. It was eaten in 2 days. Don't worry, we had some helpers.

Layer 1: Refried beans mixed with taco seasoning
Layer 2: Cream cheese mixed with green chiles
Layer 3: Cheese
Layer 4: Salsa
Layer 5: Green Peppers
Layer 6: Olives
Layer 7: Onions
Layer8: Green onions
Layer 9: Tomatoes
Layer 10: Lettuce
Layer 11: Sour Cream

Oreo Truffles


I discovered a new recipe as I was exploring fun blogs. It looked so delicious that I couldn't pass it up. They are oreo truffles and are pretty simple to make, except for the dipping part. Check out Bakerella's blog and she has the instructions on how to make the truffles. I was unable to make my truffles as pretty as hers so I crunched up and shifted oreo "dust" over my dipped oreo truffles to hide the flaws.


Sorry about the quality of the photograph. They look much better in person!

Costco Samples!!!! Margarita Chill


Garrett and I went to Costco with the intent of running in to buy a shirt and leaving. First of all, they no longer had the shirt we were going to get. We saw some sample stations that we just couldn't pass up. Who doesn't love Costco Samples???????????? I don't know about you, but I never buy the items that I sample, or at least never had in the past. I often question whether or not they benefit from giving out samples. This Saturday they were not only giving samples (small amount) , but full size Creamies.
Creamies are my favorite. They now have new flavors- peach and raspberry.
We tasted some other samples, none that were too great. There was one though, that was delightful to our taste buds. It was a margarita slushy drink. Don't worry, alcohol free. The old lady that was making the samples made sure everyone was aware that there was no alcohol. Garrett and I loved the drink so much that we couldn't pass up buying the margarita drink flavor. It cost 7 dollars for two bottles.

To make the irresistible drink you need to remember the number 2!!!
- 2 cups margarita mix
- 2 cups ice
- 2 cups vanilla ice cream


We also decided to experiment by mixing some strawberries in with the slushy drink. It tasted great too!

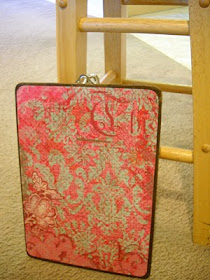
Stylish Clipboard

My friend, Angel, came over so we could craft it up. We decided to mod podge clipboards. The hardest part of this project is finding clipboards. We went around to tons of stores (or so it seemed when you are in a time crunch): Michaels, JoAnn's, and The Dollar Tree and none of the stores had clipboards. We finally found clipboards at Smith's.

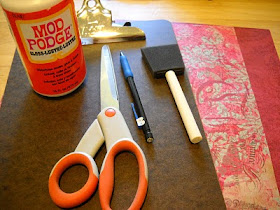
The supplies you need to mod podge a clipboard include:
* 2 sheets of cute 12 x 12 paper
* Foam brush
* Mod Podge
* Clipboard
* Pencil
* Scissors


1. First, cut out your paper to fit on the clipboard. The clipboard is a little longer than 12 inches so I cut out my paper so that there would be a little border of the brown clipboard. I also rounded the corners.
2. Generously lather on mod podge to the front side of the clipboard and then smooth the paper down with a plastic card (gift card, etc).
3. Next, generously lather on mod podge to the top of the paper and smooth the mod podge with a plastic card.
4. Do the back side of the clipboard the same way.
5. Let it dry and WALA !!!! you have a good looking clipboard.

At school, I keep all of my important papers on a clipboard. Now, I won't have to look at a plain boring, brown clipboard.


08 July 2010

WARNING: May cause addictions.


I came across an amazing blog the other day and have spent hours cruising around looking at all the great ideas. Many of my college friends know my love for Lofthouse sugar cookies. They are very soft with frosting on top. Today I found a cookie recipe that compares to these tasty cookies. Sistersstuff claimed that the cookies tasted like Lofthouse cookies, but I was a little skeptical. Luckily for me, when I had the urge to bake a new treat today I opened up my pantry and had all the ingredients for the Lofthouse sugar cookies, which are:

1 Pkg. white (vanilla cake mix)
1/3 C. Vegetable Oil
2 Eggs

The directions to make the cookies are:
Preheat oven to 375 degrees. Mix cake mix, eggs, and oil until moistened. Roll into 1" balls. Put them on an ungreased cookies sheet. Flatten with a glass or cup. Bake at 375 for 6-8 minutes. I baked mine for 6 minutes because they harden more once they are out of the oven. Allow the cookies to cool 1 minute before transferring them to a cooling rack. While the cookies are still a little warm, spread on some frosting. If you want to add some color, sprinkle on some sprinkles.


I am telling you these are some amazingly tasty cookies. They are pretty too.

Scrapin' books

I haven't blogged for a while because I haven't done anything too exciting or new. I have been scrapin' up a storm this week. I had some big projects that I wanted to finish before school started. Since I don't have a craft room or table it makes it difficult to start a project, leave it, and then come back to it later. So once I start a project I try to finish it or else I have to pack it all up and then unpack later. This week my first project was scrapbooking all of my pre-wedding, wedding, and post-wedding pictures-- which was a lot of pictures. It took a lot of time, but it feels sooo great to have all my pictures neat and organized. Here are a few pages from my scrapbook. The pictures aren't very clear-- sorry.


My second project was making a missionary photo album for Garrett. Garrett had about 400 pictures from his mission just in a box. I wanted to organize them for him so originally I was going to scrapbook all the pictures, but then I realized this would be too hard because I know nothing about the pictures. I decided to just organize them by date and put them in a photo album. (I got the photo album from Michaels with a 50 % off coupon. The only way to shop at Joanns and Michaels are with coupons. ) I also made labels for all the areas he served in and special events.


04 July 2010

Hair clips


Wherever I go these days I see clips, bows, headbands, and flowers in babies, toddlers, kiddos, teenagers, young adults, and moms' hair. However, I have yet to see a grandma wearing these fancy decorations in their hair. I have seen all different sizes of these flowers/bows in hairs -- tiny bows on newborns' head (no hair) all the way to little girls wearing bows 3/4 the size of their head.
I decided to experiment with making hair accessories.


Materials needed:
* Flowers
* Hair clips (from craft store)
* Hot glue gun
* Decorative Brads
* Stylin' ribbon


Here's how:
1. Select and stack your favorite combination of flower blossoms.
2. Insert brad through flower centers.
3. Insert brad through the decorative side of ribbon 1 1/2'' from end. Flatten brad legs.
4. With hot glue, adhere the clip on back of flower, centered with flat side up.
5. Apply hot glue to short end of ribbon and fold to inside of open clip.
6. Apply hot glue to longer end of ribbon and wrap in and out of clip handle.
7. Clip your new flower in your hair, on your hat, on your backpack, or anywhere your heart desired.

Next time I make these (if I ever do) I would a greater variety of colors. I think some of the flowers are just too plain--- white.


Doughnuts


A week ago Garrett and I made the most delicious doughnuts. They are so addicting. I am warning you ahead of time, that you may become addicted to these tasty things. They are so simple and so good.

Ingredients: Biscuits, cinnamon and sugar, and oil! Yup, that's all!

Directions: Put vegetable oil in a pan and cook it on medium heat. Meanwhile, use a small circle cutter (we used the top of the oil container) to cut holes out of the middle of the biscuits. We also tried making bigger doughnuts but they don't cook as well. Put the dough in the oil and it will cook quickly. Keep an eye on the dough and once it gets a golden color flip it over and cook the other side. Take out the doughnut once it is no longer doughy. Lay the doughnuts on a towel to get rid of excess oil and then roll the doughnuts in cinnamon and sugar. Then enjoy with a glass of milk.